Gather supplies needed. In this tutorial, I will be using the Little Dreams Collection Paints (LDC). Refer to my free tutorial on Doll Dreams to blend the LDC paints.
~LDC Tutorial on Doll Dreams~
I have my pallet filled with colors that I might use for the particular doll I am working on. I have selected the color of hair that I will be rooting over the painted hair and have chosen colors to contrast and match that hair.
My brushes of choice are a #3 Liner, #5 Liner and the Little Dreams Collection hair painting brush (however, I ended up not using the LDC brush for this doll~but I had it ready just in case!)

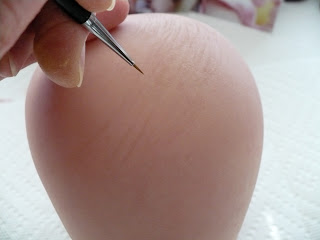
It is a matter of preference and how you see things as to where you would start painting the hair on your doll. Most of the times I start at the crown but sometimes I start at the back of the head. Try different ways until you feel comfortable. first, I will paint a few strokes starting from the crown going towards the forehead. I check my paint color choice with the chosen hair to see how the colors match.

With my #3 liner, I continue long and short strokes from the crown toward the forehead but at a "growth pattern" to the left (dolls right). The face is towards me.

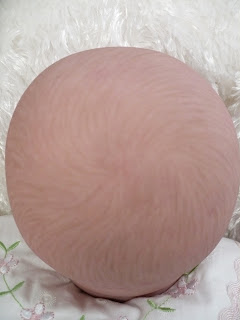
Continue in a single layer (you will add more layers and colors later) painting stokes into a natural growth pattern that you think will look nice on the doll you are working on. Think ahead to rooting hair over the painted hair. Make sure that you have the ability to root in that direction.

It takes me at least one hour per color and layer of hair that I am painting. Here I am just continuing the strokes of hair. The hair is looking more "real" as I add. When I first started in the pictures above, you can see that it sure did not look like this paint job would turn out well. It's a building and layering process and takes time.


As I mentioned, I will be rooting hair over this painted hair so I am not filling it in as much as I would if I were to leave the head just painted. A lot of the painted details are pushed into the vinyl when rooting but some remain and I like using the painted hair as a guide for rooting, especially if there is a specific style I am wanting to achieve.

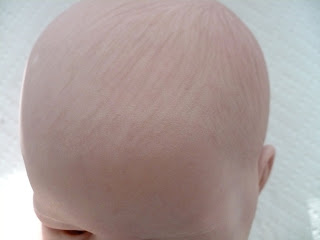
Now I begin adding my next color. This color ended up being my final color on this doll. I did not use any of the other colors in my pallet, just two colors did the trick on this doll.

I use this color on all of my painted haired dolls. It's just amazing! It's a pinky/flesh color and adds so much to any color I use.
It's especially wonderful for those fine baby hairs around the face.


If this head were to be left just painted I would spend a lot more time on it, refining the crown and adding more depth and dimension. I have painted her eye brows with the same colors.


Yay! Thank you! I'm still a bit scared, but I might just try this on my next one.
ReplyDeleteAwesome tutorial!
ReplyDeleteWhat is the pinkish color you mention you use on all painted hair dolls?
ReplyDeleteThe pinkish color is the lightest color in the pallet in the picture. It is to the bottom-left. I make it by using flesh and rose colors from the LDC paints so that type of combination from other paints would work too. Does that help?
ReplyDeleteMaybe you would think about doing a video tutorial on painting the hair. I have been looking for one everywhere with no luck. Im sure there are many people who would pay for that tutorial. This is a really good tutorial and I will use it. Step by step video is better though.
ReplyDeleteThanks for the suggestion Tammy. This is a dream for me...to do a full reborn video DVD. It's a goal of mine in 2010-2011 but there are a lot of things to work out just yet. The biggest thing is having someone to record me work. I am working on plans with Doll Dreams to do courses at their warehouse meeting room (yet to be completed) and have their tech specialists record me. I'll for sure post updates on the blog.
ReplyDeleteI agree with Tammy. A video tutorial on painting reborn hair would be wonderful! I will use this but would love to see it in action.
ReplyDeleteThank you so much for this useful tutorial. I have searched everywhere for this information and this has certainly given me a starting point.
ReplyDeleteI am very grateful. Many thanks.
thankyou,very informative and helpful tutorial.
ReplyDeletethank you i am trying do do painted hair so thats very useful information
ReplyDeleteThat was a very good tutorial, thank you.
ReplyDeleteAlso, what baby is this and are those the limbs that actually go with her (I know some people use other limbs). She reminds me of me when I was a baby and I would love to do one for my mom's 72nd birthday.
Thanks so much,
Pat
Hi Pat,
ReplyDeleteThank you~I am glad it helped. Yes, those are the original limbs for that Berenguer doll. She is the "Beautiful Embrace" doll. I made this baby for myself and love her. I bet your mom would too. She is a nice sized baby.
This is an awesome tutorial Debbie. I plan to give it a try. Your really amazing & so helpful!
ReplyDeleteDale :)
Good morning! I thank Karen sending tutorial with information and illustrative pictures about painting hair reborn. It has helped her helpfulness. Success in your career!
ReplyDeleteHugs and kisses from Regina.
Obrigada por compartilhar conosco. DEUS te abençoe sempre!
ReplyDeleteObrigado! Você me tocou!
DeleteWhere can I buy these paints for my reborn baby boy?
DeleteFrom Irresistables websitehttps://www.irresistables.com/search.php?search_query_adv=LDC+paints
Deletehttps://www.irresistables.com/search.php?search_query_adv=LDC+paints
Deletehttps://www.irresistables.com/search.php?search_query_adv=LDC+paints
ReplyDelete