
For Anonymous who asked for pictures of Kristaleta's head before work began. This is the best I could do.


Okay ladies, I first want to clarify that this is the first time I have used an armature like this in a reborn doll so I am learning as I go too. I feel I have done a pretty good job but sure am open to suggestions and helps if you have any to offer! Send a comment to me and I'll add it to this post.
I believe it takes a community to create the best reborn doll :)
**************************************
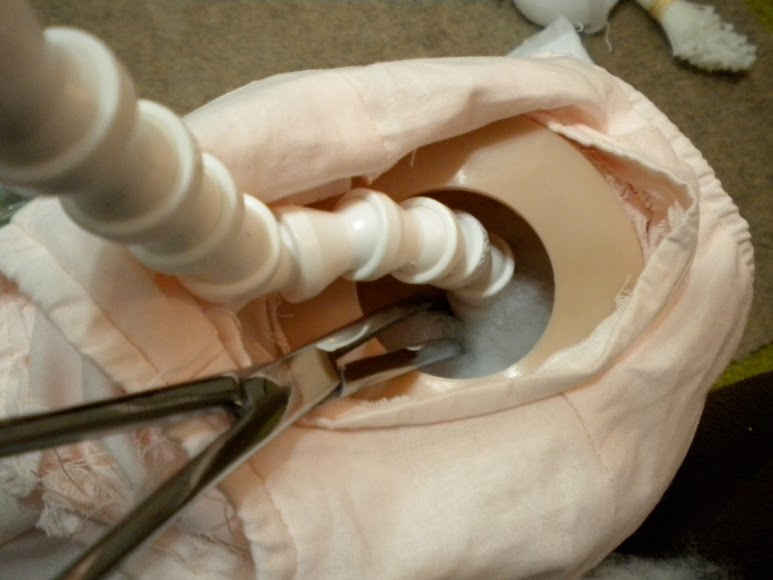
First I am going to show how I will be putting medium plastic pellet-filled bags in the crotch area of the doll. It is easier to show this without the limbs on the doll.
You actually will not be assembling the doll this way as first you will put the legs onto the cloth body. These pictures are only for teaching reference.
I have slipped the armature into the cloth body.
(you can purchase the 27-28" armature from Kemper Dolls OR Dolls by Sandie
After assembling Suzon, I am wondering if the 26-27" armature might be better.)

Here I have placed 3 medium pellet bags (purchased at Dolls by Sandie) into the crotch area. I've put two in the back and one in the front.

Another view...

To begin really weighting this doll for reborning, start without the armature. I used just plastic pellets in her feet just to the top of the foot and then FIRMLY stuffed fiber fill just up to where the armature will meet. It is really important to just stuff in small clumps of stuffing, pressing each clump down firmly before adding the next. One won't be able to fill in all of the gaps by putting a lot of stuffing in and then pressing it down~it simply does not work and creates hard spots and void spots.

Attach the legs to the body using zip ties. Here I show how her bum is going to look when I add the pellet bags later, after the armature is placed.

So without any stuffing/pellets in her body, place the armature inside the legs. Pull back the cloth body to expose one of the flanges of a leg. You will begin firmly stuffing fiber fill into all the areas surrounding the armature. Again, be sure to use small clumps of stuffing, pressing each as you go. You will need a firm pile stuffing, not the cluster stuff or very soft pile.

Begin placing small amounts of stuffing into the leg hole and using a strong dowel rod or large forceps, firmly fill the entire space around the armature with stuffing.
Repeat the process with the other leg.

So far, so good. She is standing on her own!

Begin weighting the body. I have re-placed the medium pellet packs into the crotch and bum area and then used a nylon of baby fat pellets (non-corrosive) along the back side of the body. Fill in any gaps with fiber fill. Because she is a standing toddler, you will need to firmly stuff her body.

She is halfway filled up and still standing!

Hmmm..I did not really take pictures of her arm assembly. It took me about 3 hours to get to the point seen below...I think I got tired! First I placed some plastic pellets in her hands and then firmly stuffed fiber fill up to where the armature will reach (I did take some links out of the armature for her arms as I did not want it to go into her hands~use a strong pier and just bend them until they snap off) There is not as much space in the arm holes with the armature in as there was with the legs. What I ended up doing is wrapping the fiber fill (quilt batting might work well for this) around the armature very snugly and then eased the fiber fill wrapped armature into the arm holes using different sizes of forceps to help. This took a long time to get it right, making sure that there were no gaps left without stuffing. Whew...it is a lot of work but worth it in the end.
So here she is with her body stuffed too. I added more nylons with baby fat pellets in the back to help balance her. Unfortunately, even after I placed her head on and re-adjusted her weight, I could not get her to stand completely on her own for more than just a few seconds. It might be the pellets in her hands. I might try to adjust this. Adjusting her and putting her head on took another hour so ladies, take your time and know that you are not alone in taking a long time to weight her. The more time you spend, the more realistically she will move and feel.
Both Kristaleta and Suzon have large, heavy heads. It is not necessary to add weight to their heads. I suggest stuffing the head with stuffing to add firmness to the head for a realistic effect.

Now...is it necessary to use an armature with Kristaleta and Suzon? No, I don't think it is, however, she may not be able to stand almost on her own. The armature sure does add a lot to her personality and posing ability. Look how cute she is in this picture with the armature bent this way and that:
 I hope I have covered everything! If not, please send a comment and I will update this post.
 I hope I have covered everything! If not, please send a comment and I will update this post.
Have an excellent day!


Great tutorial, Debbie! I feel like I could go out and actually weight my own toddler doll now.
ReplyDeleteThanks!
Awesome Debbie! Thank you for sharing! It helped me a lot!
ReplyDeleteThanks Debbie. I just have one question, did you attach the arms to the body before putting in the armature and stuffing, or did you put the armature and stuffing in the arms first, then attach to the body with the ties? Thanks, Judy
ReplyDeletei am in 5 grade and i still LOVE reborns they are amzing dolls! AND I LOVE that toddler up in that pic OMG i wish i could get here lol. but mom my mom does not want me getting a new one! ohhwell i am going to get a lot when i get older! how much is thaat toddler? if u dont get too let me know that just fine!!! ok thank you very much byeeee
Deletehi i am back the girl who said she is in 5 grade soo i want too still order that reborn, i love her she has a GREAT skin ton and her hair uhh i love her so much if there is anyway u can tell me how much she is? that would be great lol thanks! also if u cant tell me how much she is thats deff ok! thanks byeee
DeleteHello little 5th grade sweetie. I'm so glad that you love reborn dolls. Yes, you will be able to get more when you are older. Did you know I was almost 40 years old before I was giving my first doll? But Kara was very much worth the wait!
DeleteIn regards to this toddler, Kristaleta, she already has a loving mommy in Australia.
You come back and look at her anytime that you want to.
Take care~
XXOO
Debbie
Hi Judy,
ReplyDeleteI left that information out, didn't I??? Because it's such a long and tedious process to get the wrapped armature into her arms, hold off attaching the arms with the ties until you are happy with how the armature feels inside the arms as you may have to remove the arm a few times until you get it right.
Thanks so much Debbie, whew, now I think I can put her together. I'm so glad you did this tutorial, I'd be lost.LOL Hugs,Judy
ReplyDeleteHello, thank-you for the tutorial,
ReplyDeleteSo you did not weight her head?
Thank-you,
Sandi
Hi Sandi,
ReplyDeleteNo, I did not put weight in her head. Most of the time with bigger babies like this, the head weighs enough and added weight only makes the doll top heavy and makes it hard to pose her naturally. If anything on a big doll like this, just a little in the neck opening is all that is needed but the way the armature is designed, it was not needed with her.
What size eyes does she take?
ReplyDeleteThanks so much
Brenda
I used 24 MM Soft Silicone glass Masterpiece eyes. Lovely!
ReplyDeletehello, could you kindly upload a picture of her head prior to doing anything on her. i can't see what she looked like before as no one seems to have any pics of just her head before they started.x
ReplyDeleteI'll see what I have to upload. I don't recall if I took one of the blank kit.
ReplyDeleteI have alredy purchased this kit which I had made up for me but unfortunately does not stand up . This explains everything to me. Thank you for sharing this information with me and everyone else out there with the same problem.
ReplyDeleteYou are very welcome Anonymous~I'm glad I could help.
ReplyDeleteDebbie
Thanks for the tutorial. I have just re ajusted the glass beads in the feet for the second time and re stuffed legs. I am so frustrated, they are nice and firm and the stand alone but as soon as i lift the legs up the glass beads are running out of the feet. Thinking they are way to fine now. So off I go and try again with larger beads, lol. Hilary. :(
ReplyDeleteHilary, I use tiny, granulated glass beads the size of sand in mine. The trick is really, REALLY stuffing that stuffing in every firm in little bits at a time. That will hold your glass beads in place. Mine did not move at all in either of the LTR toddlers I did.
ReplyDeleteLet me know how you end up!
Hugs
Debbie
Thank you for your great help!!!
ReplyDeleteHugs,
Marga
Rebornbabydreams
Hi Debbie
ReplyDeleteI received the request to introduce an armature in a doll "Celeste" by adrie Stoete As the body has 3/4 arms and legs, articulated joints with metal inside, I'm not sure how to do. Do you have any help you can give me?? I would greatly appreciate, believe.
BR. Paula Labato Faria (portugal)
Hello Paula,
ReplyDeleteI am familiar with Celeste and how she goes together. Because of her 3/4 limbs, one really cannot put an armature into her~except for just in her body/torso. I assume that the customer wants her to stand up alone?
I am sorry I cannot be of more help.
Debbie
Hi Debbie. It's true, Unfortunately, I am disappointed because my client saw the various pictures that are published on "Celeste"appears standing alone. There must be a way .... I'll send you some photos by mail. May be someone on the blog know how to help me. Tks again.
ReplyDeleteBR.Paula
Paula, you will have to gently inform your client that it will take some balance and skill to make Celeste (and any of those Adrie toddlers) stand all alone. Even Kristaleta was unable to stand all by herself for long periods and it is always safest and best for our dolls to have some small support even if they can stand alone.
ReplyDeleteSometimes it is difficult for people to see in pictures that dolls standing alone usually have some kind of support. In the picture that you sent of Celeste, she was holding onto that flower barrel.
I will keep you in my thoughts while you confer with your client. Good luck!
Debbie
;)... I'm so unhappy!!!!!!
ReplyDeleteBut...
the sun is shining outside and here's a beautiful summer day !!!!!eheheh
Tks. H & K
Paula
hi Debbie,what sculpt have you used in this tutorial.I cant seem to find it.
ReplyDeletesarah.
Hi Sarah,
ReplyDeleteI've used Kristaleta by Laura Tuzio Ross. It was a limited edition sculpt and I believe it is sold out. You can do a search for it :)
Good luck!
Debbie
thank you for the tutorial..
ReplyDeletecan u make a toddler likebthat for me just like her
ReplyDeleteHello Reborns,
ReplyDeleteI am sorry, I am no longer taking custom orders. I hope you find the toddler of your dreams!
Happy New Year~
Debbie
Hi Debbie, is there any way you can give me the link to that body your using, i have looked everywhere for one and i cant find it anywhere, im making Award winning OLIVER kit
ReplyDeleteby Sandra Maxwell, he sooo adorable but its next to impossible to find a body for the kit in that size, so i just saw another reborner used a 26 inch body and it looked great, i got the armature from sandies, thos i didnt see the pellet bags in her catalog anywhere, im desprate for help, can you help me pleaseeeeee, Shaylee Ella
Hi Shaylee Ella,
ReplyDeleteThe body is the body that came with Kristaleta/Suzon from Laura Tuzio Ross.
http://www.tuzioillustration.com/
I don't know if you can get just a body from Laura but you could ask.
Spearson Doll Bodies does excellent work on custom bodies. I use them a lot. Maybe you can have them make one for you.
And I do believe that Sandie is sold out of the pellet bags. You can make a pellet bag out of fabric and pellets or you can use a stocking filled with pellets. It won't work quite as well as a square bag but it won't be horrible either.
I hope this helps!
Debbie
http://spearsondollbodies.com/
Thank You Debbie, Ive just messaged Laura Tuzio Ross, I'm hoping she responds I really want to get a move on this kit... have a great day :)
DeletePlease be patient with Laura. She is battling an illness right now. She will get to you, I am sure, just be patient.
ReplyDeleteHugs!
Hi, I was wondering, do her legs bend with this in her? Thank you :)
ReplyDeleteHi!
ReplyDeleteShe can sit on her bottom but no, her leg does not bend. The vinyl is not designed to bend.
Hi, Debbie! This is Joann. You did a beautiful job on this gorgeous toddler! How tall is she, what size clothes, shoes, and diapers would she wear, and how much would she weigh finished?
ReplyDeleteHello Joann,
DeleteThank you!
Kristaleta was 30 inches tall. She wore size 9-12 month clothes, if I remember correctly, a size 3 shoe and a size 3 diaper. She weighted 7 pounds as I do not like to weight my toddlers heavy so that they are easy to "play" with.
Thanks for tutoral! Can I use a 26" doll armature for a 31" toddler doll (Emilia by Natali Blick)
ReplyDeleteWell, I have not personally worked on that sculpt nor seen it in person so I really can't give an educated answer. Is that size all you can find?
Deletewonderful tutorial.........thank you Debbie
ReplyDeleteTHANK YOU Debbie... I would have forgotten the armatures....
ReplyDeleteYou are so welcome Verla! Big hugs!
Deletelovely thank you so much ... which kit is this lovely girly please?
ReplyDelete