
Hello and welcome to my blog where I have created a simple tutorial to show just how easy it
is to create a beautiful life-like baby doll using the Special Care Air Dry Paints.

The Special Care Nursery paints were designed with the beginning artist in mind.
The "Beginner Set" has all of the pigments, mediums and thinners added in.
One just simply stirs then well, pours them from the jars and goes to work!
It was hard for me to stay within the boundaries of how a new artist would work, and not bust out with all of my Master Artist techniques during this painting session! I will be very anxious to use these paints within the Master Artist realm in the future but for now, I am DELIGHTED with how
beautiful these paints are and how this Simple Treasures Series baby came to life.
He truly is very real looking.
So, let's get started!
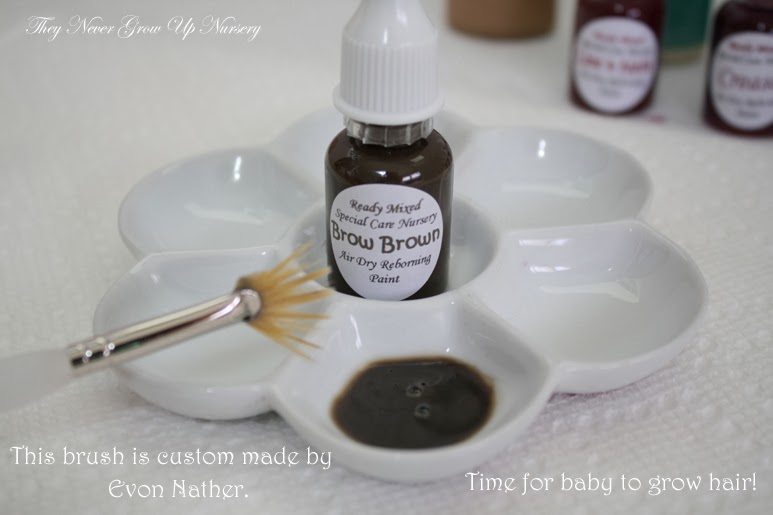
Supplies:
- One "Beginner" set of Special Care paints
- Special Care Gloss and/or Satin Varnish for lips and nails
- If you are making the move from Genesis paints to air dry, you will need a new set of brushes and sponges for acrylic paints. Never use brushes used on oil paints with air dry paints.
- Wedges
- Bowls for rinsing water
- Small saucer plate or palette with a well/dip in the center
- Flower palette or a small dish or two
- Paper Towels
- I highly recommend that a vinyl or plastic glove be worn on the hand that handles the vinyl parts, no matter what paint you use to paint your doll with. You see, oils from your hands can stick to the vinyl creating many problems for you as you paint~the number on being that the paint won't stick.
- A new doll kit that has been washed in hot water with dawn dish soap and rinsed well
I was asked to test these paints, so I decided to reborn my first "Soft Line" vinyl sculpt from
Doll Dreams. I've never worked on one of these and thought this would be an exciting journey.
(By the way, I LOVED working on this vinyl and the paint took right to it. I did not coat this kit with any sealers or varnish before I began, or after I was finished.)
The kit I selected was Joshua by Reva Schick.
The vinyl is really quite creamy already but I desired to use either the Blue Wash or the Mint Wash just so I could test these washes out.
I felt the color was closest to the "pink" tone, and even though I did not show the color on the other side of the color wheel that would neutralize it, the neutralizing color would need to be the Mint Wash.
(CLICK ANY OF THESE PICTURES TO VIEW FULL SIZE)
~The coordinating text for each picture is ABOVE each picture~

Stir the bottle of Mint Wash (or Blue Wash should your kit need blue) using a thin wooden skewer or a small paint brush. Pour it directly onto your small saucer or palette.
Swish some of the color up onto the side of the palette and dip a just damp sponge into it.
(You will see a sample of this in another part of the tutorial.)
Soak a clean wedge in water and squeeze out the excess. This is a handy thing to have on hand for beginners in the event that you need to quickly remove paint before it dries.
The process for application of air dry paints is typically the same on all layers:
Apply paint with a damp (with water) brush or damp (with water) sponge/wedge and finish up with a dry wedge and/or dry mop brush.
Rinse brushes and sponges out frequently, blot drying on clean paper towels.
Change your wedges often.
Sporadically apply the Mint Wash (or Blue Wash) to a section of your kit,
starting at the back of the head.
Just one pounce of the damp, paint-loaded sponge is all you need to do. If you keep applying it over and over again you won't have any texture to your doll in the end. Leave open spaces for the natural vinyl to come through, unless your kit is a horrible orange, brown or pink color. In that case, coat all of the vinyl, but in small sections.

Immediately pounce the wet paint with a dry wedge until the paint is just dry.

Continue onto the top of the head, around the ears and onto the face, working in small sections. Rinse your sponge as needed and change wedges often.

As a side note, this type of sponge does not do well to be re-used, except for the current color you are working on. Once you are done with that color completely, it is best to throw this type of sponge away as the texture seems to be jeopardized over time.

Use a dry mop brush to pounce the paint in areas where the wedge does not fit.
I keep 4 of these mop brushes on hand for one painting session, rinsing them and allowing them to dry when I feel paint is building up on them.
I always have a dry one available to use this way.

I have finished applying the Mint Wash to the head. Here you can see the comparison of the coated head and uncoated leg.

At this point, it is typical of me to set the Mint Wash aside and begin the lips.
Stir the Lip and Nail color well and place a small amount into your flower palette or small dish.

Using a damp filbert brush, apply the color to the lips avoiding the center of the top lip
on the first pass through. Blend and refine the paint by blotting your application brush on paper towels, using the dry brush to follow up your work, then blot any excess paint with a dry wedge.
On the second layer, (which can be applied right away)
lightly coat the center then immediately use a wedge to soften the color until is almost isn't there.
Add color as desired, making some areas lighter and some darker.

I then set the head aside and begin applying the Mint Wash to the limbs, starting with a leg.
I always work from the bottom of the foot/palm of the hand up towards the flange of the limb.
The techinque is the same for either leg or arm so I only show the work on a leg.
Once I have applied the Mint Wash to the foot using the same procedure as the head, I set it aside and I start work on the nails.
I have always preferred to use a purple color on my nails so I will use the Eyelid Purple on these nails. Feel free to use the Lip and Nail color on your doll if you desire.
Place a small amount into your flower palette or small dish.
Apply a wet layer of the color to the nails,

then quickly blot dry your brush on paper towels and go over the nails removing excess paint with the dry brush.
Use a wooden pick to remove paint from the creases and use a damp wedge to remove paint from the front of the toes and fingers.

Set the Eyelid Purple color aside and continue applying the Mint Wash to the leg/arm.
Repeat this process until each limb has had the Mint Wash applied and the nails coated.
Once the limbs are complete with those two steps, I go back to the Eyelid Purple color and
apply it to the upper eye lid.

Very quickly pounce with a dry wedge.


Continue with the other lid.
I also use Eyelid Purple on the lips!
Just one layer of Eyelid Purple adds much to the lips.

At this point, I am finished with the Eyelid Purple and the Mint Wash.
Clean off the plate and palette, saving any excess paint in a clean, airtight container.
Do not put your paints back into the original bottle as they have changed in consistency and we don't want to compromise the perfect mixture that is in the bottle.
When you go to use the self-stored paint for a future project and it does not "behave" well for you, simply toss it out and start with fresh paint.
The next layer is the Dark Pigment Wash.
Pour some of the paint onto your saucer/palette.
I apply it with a damp, large pore sponge as seen in the picture.
This is a sponge that was located at an Equine supply store and is a
horse bathing sponge! I just just a small section from the large sponge.
As you can see from the pink color on this sponge, this sponge does very well to be used over and over and over again. Rinse well during use and after each completed step.

Apply this color sporadically, in small sections just like you did the Mint (or Blue) Wash.
This sponge has lager spores and creates more defined texture as you work.

Once the head is completed, begin work on the limbs starting at the bottom of the foot/palm of the hand until all pieces are coated.
Remember to rinse your sponge often and change wedges often.
You are now finished with the Dark Pigment Wash and can clean off your saucer.
Next you will be shading the creases and folds of you kit.

I like to use a Round #5 brush for creases, sometimes selecting a smaller round brush for very small creases.
As always, use a damp brush and rinse often.
Work on only one or two creases at a time so that the paint does not begin to dry.

Smooth out the paint and remove excess with dry wedge and/or dry mop brush.

Continue in all creases of the head, including the back of the head in neck creases, the ears
and the nostrils.
I like to apply a little bit of the crease color to the creases of the lips.

Set the head aside and begin work on the bottom of the feet/hand working up to the top of the leg/arm.
Use a smaller brush if needed on the creases across the tops of the toes and fingers.
Repeat the process until all of the limbs are complete with creases.
At this point, because I had taken time to take photos of the process while I painted, I am finished for the first day.
I probably would have gotten the next step finished in this day while I had good light.
I tell you this so that you can gauge what amount of time it will take you to paint your baby doll, so as not to discourage you that it is taking so long.
My husband always says, "you can't rush art". Indeed.

The next step is a unique step that I created many years ago that I call the "Newborn Flush".
I guess you could say this step replaces the Berry Maker for which I never did succeed with.
I will use the Pale Mottling/Blush for this step and will explain it in greater detail than the other steps because it has been my experience that this is the area that many new artists struggle.

This layer will add a great amount of detail and visual texture to you doll when done correctly.
The keys to success on this layer are:
Have a very small amount of paint on your large pore sponge.
Keep the application of the paint very sparse and well spaced.
Follow up immediately with a dry wedge.
Lets get started!
Using a brush or a craft stick, swoosh a small amount of paint up onto the side of your
saucer/plate/palette.
Allow much of the paint to flow back into the well in the center.
You want a VERY thin layer of paint left on the plate.

With your sponge just damp, dip it onto this thin layer of paint.

Pounce the painted sponge onto a clean paper towel.

Apply the paint sporadically starting at the back of the head and in small sections.
Space the application out so that the color will not run together making an opaque and flat tone.
Here you can see just how spaced out the color is and how soft yet very vivid the visual texture is!

The same is true on the face as well.


Apply the paint in the same manner to the limbs, starting at the bottom of the foot/palm of the hand.
Wet paint on:

Wet paint pounced in/off:

Continue up each limb until you have reached the flange.

Once the limbs are complete, use the same color, the Pale Mottling/Blush
to color the ends of the toes and fingers.
(As you will see in another photo further down in the tutorial, I typically apply the Newborn Flush techinque to a limb then go back on that same limb and color the toes/fingers, then continue on with the next limb. You can do it either way~either way is perfect.)
First, use a damp brush to liberally apply the color to the bottom of the toes/fingers.
Just do 2 or 3 at a time.

Then quickly pounce with a dry wedge.

Finish it off with a dry mop brush to get between the toes/fingers.

Using a damp brush, add color to the tops of the toes/fingers.
As always, follow up with a dry wedge and dry mop brush.

I'd like a little more color on the ends of the toes and fingers.

With a damp brush, paint some color onto the edge of a wedge.

Apply that color to the toes and fingers and follow up with a dry wedge and dry mop brush.

Much better!

Here is the picture that shows that I complete the Newborn Flush technique then color the toes/fingers before I carry on to the next limb.

Once the Newborn Flush is done, we can blush the doll using the Dark Mottling/Blush
and a damp sponge.

Here is where you will not be applying the color to the full surface of the vinyl.
By that, I mean that this is even different than applying "sporadically".
In short, the blush is applied to the "high" spots on a kit, such as all of the fatty places.
In the next two pictures you can see where the blush was applied to the head and face.

Be sure to blush the backs of the ears, the ball of the nose and above the upper lip.

Blush the bottoms of the feet and palms of the hand heavier.

Some blushing on the leg.
On each side of this trail of blush, I would not blush until I got to the fat calf in the back and the fattest part of the front of the leg, and over the knee.

The fully blushed leg.
The blushing step has created lighter "channels" where the Blue Wash, Veins and Pale Pigment colors will go.

With that, it's time for the Blue Wash/undertones!
You can now clean the Dark Mottling/Blush from your palette.
The Blue Wash is applied with a damp mop brush and followed up with a dry wedge and a dry mop brush.

Begin at the back of the head, mostly in that channel that the blushing created.
Instead of "painting" this color on, blot it/pounce it on with the mop brush.

Follow up with a dry wedge and or dry mop brush.

Once the back and top of the head is complete, move around to the front of the face.
Apply in the area shown as well as above the eye brow bone, at the temples, in the ears~randomly, and over the eye lids.

Use a dry wedge and dry mop brush to pounce dry.

Set the head aside and apply the blue wash to each limb in the "channels"
that the blushing created.


With all limbs complete, you can now clean the palette of the Blue Wash and prepare
to create the veins.

Use a small, damp round brush for the vein work and work in small sections,
drawing on random veins, keeping them mostly withing the channels that were created from the blushing step and over the top of the Blue Wash, in most circumstances.

Quickly pounce with a dry wedge.
This picture didn't turn out very good but the next one is better.

The upper part of the veins are wet/not pounced while the lower
part of the veins near the temple are pounced.

Veins are random. Lighter in some areas, darker in others.
As far as I have seen, they are not the exact same on every person.
They are just in a general location.
There are a lot of pictures of babies on the internet where you can see vein patterns.
Completed veins:


When the head is complete, apply veins to each limb.


This is as far as I got on day 2.
Remember to clean off you palette and rinse out your brushes.
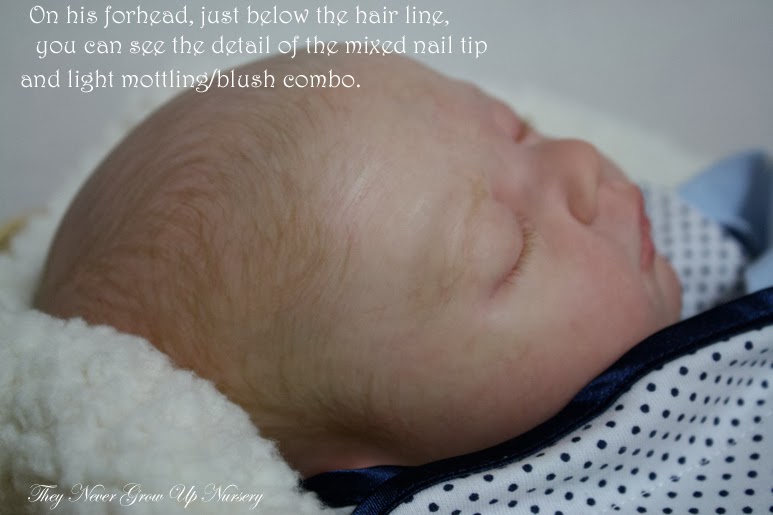
Look at how real Baby Joshua is looking!


Are you ready to add nail tips to your baby's nails?
This step makes many reborners so nervous but the blend of this paint was SO easy to use!
Stir well and place a little in the palette or dish.

Using a small round brush, paint a thin line along each nails end.
Allow the paint to set up ever so slightly.
Sculpt the nail tip with a wooden pick.
Easy-peasy!

Another area that makes new and established artists nervous are the brows!

The trick to brows is having the right consistency of paint and working in a horizontal direction from the bridge of the nose out toward the ear. Real eyebrows do not go up and down in a vertical fashion.
Start the brow just below the brow bone, extending to the horizontal center of the brow bone.
Look at real baby brows as you work.
I did a basic, just there brow as not to overwhelm the new artist,
using a long, thin, damp brush.


One last step before this baby grows some painted hair!
For this step, we will use the Pale Pigment Wash and a damp sponge.
This layer goes very quickly and is applied to the doll in any place that you want to add some visual texture, highlights or to tone down an area that is too bright with blush.
Usually this is applied to most of the "channels" that were created by the blush and to the fleshy part of the ears and over the ball of the nose.
I also add a little bit to the lips to create lighter areas and detail.
As always, follow up with a dry wedge and dry mop brush.


With that step complete, set your limbs aside to allow the nail tips to cure in preparation for glossing.
It's time for baby to get some basic painted hair.
The brow color is a very nice color for painted hair.
I am using one of Evon Nather's custom fan brushes.
These brushes are GREAT!
You can use it any which way to create different strokes of hair.
I am not going to show where the hair should be patterned as I do that on my YouTube video on the subject.
On this head, I just kept adding strokes creating lighter hairs and darker hairs until the head was covered with baby fine hair.
For painted hair, I usually do not go over all of the hair with a dry wedge, only in areas where I feel the hair is too thick or not what I wanted. The strokes will dry on their own with nice detail.

I like to add depth to my painted heads so I mix up a special color that I call
"Pinky-Flesh". To create this color, I placed a little bit of the Nail Tip color into the palette,
then added just a hint of the Pale Mottling/Blush color.


Making sure that the same customized fan brush is rinsed well,
I go over the head with the same brush and add the light color in very fine strokes.


I even like to go over the brows as well and along the forehead.


With the hair complete~and yes, even YOU can do basic painted hair!~
just look at a picture of a real baby while you work, now we can gloss the nails.
I prefer to use Satin Varnish on my nails but you can use the Gloss Varnish if you prefer.
Neither is right or wrong :)

Even with the gloss, use a damp brush.


Baby is now ready for rooted lashes and lip gloss.
I forgot to take pictures of glossing his lips and adding a little gloss detail to his eyes and nostrils,
sorry about that! I guess I got excited to get him done.
To create a softer finish and reduce the edge line of the gloss when working on the eyes and nostrils, use a dry wedge to refine.
For the lips, just brush the gloss on and refine the edges with a wedge if needed.
Welcome Joshua!

I am very excited about these paints for the beginning artist!
Of course they are great for the advanced artist as she can blend the colors and create her own style (especially when they come out with the pure pigments to go with the full line of mediums and thinners), but for the beginner, they are a wonderful addition to the painting world.
Just stir, pour and use!
Now, as an artist who has used 2 other brands of air dry paints since 2008, how do I think these paints compare?
These paints work just like any other acrylic air dry paint created for vinyl that I have used.
They have the same characteristics, behave the same and have the same pure colors that I love in acrylic paints.
As with the other acrylic paints I have used, they do tend to build up a sheen as layers are added to the limbs mostly~just like the other paints! On most heads, the paints I have used remain matte, just like these did.
Special Care Nursery is sending me a bottle of medium to try that makes a matte finish.
I will have to compare that to my special techinque if first coating a vinyl kit with
Genesis Matte or Satin Varnish before I paint, just like I have been doing since 2008 as I find this is the BEST method for eliminating shine when using air dry paints.
None of the air dry paints I use require this process. I just prefer it. :)
I hope you have enjoyed the tutorial and that any fears you have of painting your first doll or trying out acrylic air dry paints has been calmed.
I will not be stocking the paints for sale as I'd rather spend my time using them :)
Here is the link where you can purchase them:
I will not be stocking the paints for sale as I'd rather spend my time using them :)
Here is the link where you can purchase them:
I enjoyed bringing this baby to life and enjoyed writing this tutorial for you.
God bless and have fun painting!


Debbie...this is a wonderful tutorial. ..as usual. .you are the Guru of Air Dry! Joshua is gorgeous. .;)
ReplyDeleteThank you Priscilla!
DeleteI've not had time to go back and proof it all as it took all day yesterday to build, so bear with any typo's or bad grammar! LOL
In the meantime~enjoy! (I've caught my husbands cold and I'm headed back to bed soon :( )
do you have to use the green wash? thankyou
DeleteHello Marie,
DeleteNo, you do not have to use the green wash. I used it here simply to show how to use it for those who need to neutralize a kit. :)
how many drop of paint do u used do u add thinner to it
DeleteHi, great turorial thank you, how does one strip the paint after it has cured for a few days. thanks.
ReplyDeleteThank you :)
DeleteWell, I have not tried to strip this new paint but I would assume that the Doll Dreams Lotion Cleaner would remove it just like it does with any other paint.
That said, I did test the finished paint after curing overnight and I could not scratch it off nor would it remove with water on a sponge or Q-tip.
Wow! Very impressive!
ReplyDeleteGreat tutorial, I use Lillian Trigg air dry paints and mix with water and medium, then I put an air dry varnish on when I have finished. Do you just use these from the bottle, I thought they had to be mixed with a bonding? I was thinking of buying a starter set of these and your tutorial looks great, x
ReplyDeleteThank you. I have not heard of Lillian Trigg air dry paints, is the varnish that you use a part of their system? Everyone is still looking for the perfect air dry varnish :)
DeleteThe beginner set of these paints are created to use straight from the bottle to allow ease of use. All of the bonding, slowing and thinning agents are already mixed in. The colors are great too!
I buy the paints from Lillian Trigg site which is in the UK, maybe she gets them from else where. She also does a starter set which includes all the varnishes including the matt varnish, this is the final coat. I love the look of these paints and no having to mix with water or medium which you have to with the paints I use. The paints I use also advise it take up to 2 weeks to completely cure, how long does these ones take or are they ready as soon as dried. I really enjoyed your tutorial and now have you saved in my favourites, will be getting some of these paints and following your tutorial, thank you so much, x
ReplyDeleteI will check that out, thank you!
DeleteI did a scratch and water test on the paints 24 hours after I was completely done painting. I was not able to get the paints off in these tests. Most acrylic paints do seem to take 2 weeks to fully cure but these seem to take less time, which many will like.
Have fun with the new system!
Thank you, I am going to give them a try and let you know how I get on, hopefully they don't need the 2 weeks to cure which will save me so much time and ladies wanting to buy a baby, thank you again and keep up the good work. Your babies are gorgeous, you have an amazing talent, x
DeleteThank you so much for the tutorial, I have recently bought this paint, but have not used them yet. Now I feel confident after having read the tutorial. Thanks Again for sharing. Kind regards from Denmark/ Kirsten
DeleteHow can I purchase the starter paint kit? The link doesn't work that says ~In the USA~
ReplyDeleteThanks,
Sharon
Hi Sharon,
DeleteThank you for making me aware of the change in the website, causing the link to not work. I searched and found the correct link and changed it in the tutorial.
Here is the address:
http://sweetiepienursery.storenvy.com/
Can you please tell me where you get your sponges and what kind they are? Every sponge I have bought is either too hard or too soft and does not leave marks as shown in your pictures and I really want to try these paints.
ReplyDeleteAre you talking about the application sponges Sabriam?
DeleteMy favorite ones aren't available any more, they were Scrub It Cellulose Sponge Cloths. I found a package of three sponge cloths at the Dollar Tree that has ONE of the ones I like in each pack.
The salmon colored horse sponge can't be found either but Hunnybuns has a blue one that is pretty close to it.
Remember to dampen your sponges with water, put just a teeny bit of paint on your application sponge and use a very soft pounce with your wedge. If you cannot see the paint marks left behind, I would guess that your paint does not have enough pigment in it.
Update me when you can :)
I finally started using them :) I blogged about it - hope it's ok I put a link in for your tutorial here. If not, let me know and I'll take it down
DeleteDid you like them Sabriam???
DeleteIt is perfectly fine to have added the link to your blog, thank you for that! It is good to have a place for people to go to in order to learn.
Hugs!
thanks! I won't be starting to use air dry for another couple of months, but I will get the sponge from Hunnybuns and give it a try. I haven't been able to find a pattern/texture that works for me with GHSP, so I make my own by picking apart a wedge but it's not quite the same. I'll let you know how it goes!
ReplyDeleteI have noticed that sponges are getting harder and harder to find.
ReplyDeleteI use the same type of sponge with my Genesis paints so have not had to search much yet. But, as they get harder to find and what I have wears out, I could be in trouble in the future.
Do you use thinners with your GHSP or the Genesis thinning gel?
I use thinners. I've tried the gel, but I just can't get the same affect of my washes without my paint thinner
ReplyDeleteYou will have to ask someone who uses thinners how they get detail with the GHSP and I just can't see how it can be done. It's just too fluid for me. I use the thinning gel and my paints are much thicker.
ReplyDeleteIs there anywhere else one can buy SCN paint sets? I think Sweetie Pie's is still fresh out of them.
ReplyDeleteIn the US? Not to my knowledge.
DeleteThey ARE having a hard time keeping up with orders but I did receive your message on DF that Sweetie Pie had them back in stock. GREAT!
Great tutorial!
ReplyDeleteCan I ask if you would use the pink colour wash if you were rooting your baby's hair
jacqui x
Hello Jacqui!
DeleteAbsolutely! Real babies have a blushy head whether they are bald or have hair. I like to apply the pink even heavier on the scalp of a doll that I will be rooting.
Great question!
Happy Baby Making :)
Debbie
Hello again Debbie
ReplyDeleteI think this would be a great video especially for people like me who need to see what is happening in real time I have all the paints but cant quite take the plunge to use them even though your tutorial is amazing and I love your finished baby x
Hello Jacqui,
DeleteThank you for the feedback. I wish I could provide a video of everything I do but I simply cannot.
I do, however, have a complete, from start to finish, reborn DVD for sale. In the video, I use LDC air dry paints but the technique is the same as with the Special Care Nursery paints. In the DVD, I show how to prepare the vinyl, including opening nostrils, how to apply Genesis Matte Varnish to the kit before painting, how to paint the kit and blend colors, rooting, eye insertion, eye lash application, magnet application and weighting/assembly. You can find the DVD at the bottom of this page via the ARTFIRE link.
Another question - is there a varnish to finish the babies off as in the Genesis to make that feel to them - do you understand what I am saying?
ReplyDeletethank you
I do understand what you are saying. I recently published a free video on YouTube on applying air dry matte products. My favorite one is the one I used in the video called "Plaid Folk Art Outdoor Matte Sealer". You use it after you paint and my test baby was painted with the Special Care Nursery paints. It worked out beautiful and left a nice feeling finish which took away the tacky feeling of the vinyl.
DeleteSearch the blog for "How to apply air dry matte products" to find the video.
Awesome job, I would love to create such babies, but I just don't know if I could. He turned out beautiful ♡
ReplyDeleteBlessings
Reborning does take talent and skill but you won't know until you try. However, trying is expensive! So you will have to decide if you can afford to or if you would rather spend your dollars on already made babies :)
DeleteGood luck either way!
can you use a heat set gun instead of using a conventional oven for now for doing the reborn dolls.
ReplyDeleteI use the heat set paints that bountiful baby sells.
Sandra Vance
also I brought a set of air dry paints through hunnybuns.
Hello Sandra,
DeleteYes, you can certainly use a heat set gun to cure heat set paints. It will take some time to do each part but it can be done. If you find that the paints begin to look chalky after heat setting, you will need to heat set them again as that means that the paints had not cured.
Good luck!
Hi, Thank you so much for your tutorial. I am completely new to reborning and have just got the Twin A kit and the SCN started paint set for Christmas. I have started painting today following your tutorial, but i am not noticing much change to the colour of the vinyl. I dont know what I am doing wrong, I dont know if I am not putting enough paint on, or pouching it off too much, or what I'm doing wrong. do you have any advice for total beginner?
ReplyDeleteThanks :)
Have you stirred your paints well by removing the dropper and stir with a small skewer? If the pigments are settled in the bottom the paints will be lighter.
DeleteAlso, it is possible to pounce too much and hard. Plus. The layers are built one by one and won't be super vivid until later. Do these tips help?
Debbie, could you please do a tutorial on air dry painting an ethnic reborn baby? Thank you so much!
ReplyDeleteHello Barbara,
DeleteI am so sorry but I am highly overwhelmed with work and I just have not been able to get to creating an Ethnic tutorial. I WILL be teaching an Ethnic painting class using air dry paints at the ROSE show in Utah this July. Can you make it to that show?
Debbie this is the best tutorial on these paints I have ever Sean , Thank you very much I really appreciate all the help you give us .
ReplyDeleteHugs Joy
Thank you for such a nice compliment Joy! Gawsh I am blushing! I am delighted that you found the tutorial useful.
DeleteHappy reborning!
Debbie
Hello
ReplyDeleteWhen I use paint, have I to only use distilled water or can I use normal water with it?
The manufactures state to use their special distilled water.
Deletewhere do I get these paints please
ReplyDeleteThe only distributor for them now (as far as I know) is in the UK: http://www.specialcarenursery.co.uk/ourshop/
DeleteHi Debbie 4th baby made using airdry others turned out ok but this little 1 is very pale but jaundice looking how do I give her a bit more colour without making her more yellow......help
ReplyDeleteCongratulations on your 4th doll! To give her a bit more color, first do a very, VERY thin wash of the Eyelid purple. That should dilute the yellow and create a base where you can now add more blushes. If she still is too yellow after this, go ahead and do another very, VERY thin layer of eyelid purple. Let me know how this works for you!
DeleteI have been using special care since they came out, but have another reborn friend who has noticed that they fade. I have a baby put away since last year, bit of a boo boo one, and when I checked it, that has faded too and does not look as good as when I painted. Have you heard from anyone who has noticed fading?
ReplyDeleteI have not personally had any complaints of dolls fading with the SCN paints.
DeleteBe sure to stir the paints up well from the bottom using a long stick, such as a skewer. The agents that settle in the bottom must be incorporated into the paint.
Thank you for that, I always mix mine thoroughly now, the baby that had faded was done last year, and I spoke to Gill about using the paints. I have taken on board what she said, so hopefully will not have any more problems.
ReplyDeleteI'm glad that you talked to Gill about them too. Also remember to stir the paints in your pallet as you use them to keep all of the components mixed up. Happy painting!
DeleteXXOO
Hi In Each Step Do You Only Apply 1 Layer Of Each ... So For Instance 1 Layer Of Mint Wash, 1 Layer Of Dark Wash Etc?
ReplyDeleteTypically, yes, unless noted. Except for when creating an ethnic skin tone, it is very rare to repeat layers. That said, feel free to create how your eye sees it :)
DeleteI want to create a baby with a very pale to light complexion. I just don't seem to mix the right combination of colors to achieve that. I want the skin tone that looks so perfect with pale blonde hair. Any suggestions?
ReplyDeleteHi Jannie!
ReplyDeleteTo gain that skin tone, start with a thinned down layer of white or mix one of the lightest flesh colors and the lightest "pink" or mottle color (I do not know what colors you have there with you). You are looking for a color that looks light pink in your palette but goes on more white. I do have a color guide for LDC paints for that skin tone. It wouldn't be difficult for you to substitute the colors. The color guide is available in my artfire shop. (Link at the bottom of the blog page.)
I hope this helps!
Hi Debbie I have just stared rebounding and used these paints I followed your tutorial and would like to say it was great thank you so much....Karen
ReplyDeleteThank you Karen! It is so nice of you to take the time to comment! I'm so glad the tutorial helped you. Have tons of fun!
DeleteXXOO
Debbie
can u tell me how many drops of paint u used to the thinner that has bonding meduim i got starter set and the lady i talk to said it ready to u
ReplyDeleteHi Kimberly!
DeleteIt's been ages since I've used the SCN paints but let me do a little "refreshing of my memory" tomorrow when I am back in the studio; I'll get back to you!
Dolly hugs,
Debbie
HI Kimberly, I have re-read your question and understand it better now. If you purchased the pre-mixed set, you do not need to add the bonding medium to it at all...it IS ready to use! Just be sure to stir each bottle well from the bottom of the bottle using a long stick, such as a shish-kabob skewer as the bonding medium settles to the bottom of the bottle. As far as drops go...each layer requires a different amount of paint. Common sense will do you well here but my advice would be to start out with a little and add more paint to your pallet should you run low or out :) Good luck!
DeleteHi Debbie,
ReplyDeleteI noticed you said you didn’t use a base or finish on this doll, Iv used the starter kit twice now and always used a Matt varnish to finish which seems to lift some detailing, should I not be using the varnish provided in the kit to finish off?
Hello Sophia,
DeleteYes, of course you can use the varnish provided. I am going to guess that you simply need to stir your paints a bit more from the bottom of the bottle up and then let them cure longer before using the varnish.
Let me know how that goes!
Merry Christmas,
Debbie
Hi Debbie, I really like your tutorial, it’s very easy And great to follow. But I bought special Care nursery paints, and the problem I keep having is they won’t “stick” to the vinyl. So I’ll paint some paint on, and it will fade shortly afterwords, or I might paint some paint on, and it’ll just come off, it just won’t stick.
ReplyDeleteAny ideas why this might be or what I can do about it?
I currently use the Sophia kit. I wash the kit before use. And seal the lips and nails, but I just can’t get the colour to show? I must coat the skin many many times but it hardly shows any colour.
Many thanks
Hope to hear from you soon
Have you stirred the paints well from the bottom of the bottle using a wooden skewer or the handle of a paint brush? The mediums settle to the bottom of these paints and must be stirred back into them. One cannot shake them back in, they must be stirred.
DeleteI am unfamiliar with the Sophie kit. Can you please tell me who is the sculpting artist and the company you bought it from?
Hi, thankyou for getting back to me, I actually had a look and could not find an artist name for the Sofia kit, though I’m pretty sure in the past it when I’ve googled that kit it has got a name, who it’s been made by.
DeleteI do try and stir the bottles, though I can’t say whether or not a actually stir them well enough, perhaps I should stir them better, I’ll definitely be doing that in the future.
Another thing, sorry about all the questions!, you know how you say to dab with a dry wedge after painting the nails and etc, if I did that, all the paint would literally come off? Is that normal or?...
Sorry I know that was a bizzare question :)
Again, thankyou for your reply, And if you have any more advice I’d be more than happy to hear it!
Thanks :)
You are welcome. Now this kit is a vinyl kit, correct?
DeleteDo try stirring more to get all of the sediment from the bottom of the bottle mixed in, and mix it every time that you use it.
Is your touch with the dry wedge very, very soft and light? It is not normal. I have been painting vinyl dolls with air dry paints for years now and do not have that problem. Are you adding any water or anything to your paints? Did you buy any of the full-strength paints? Do you live in a very humid climate?
My turn for questions! :)
Hi, yes it’s vinyl. No, isn’t a very very soft light wedge- should it be? Hi, no I don’t add water, though I must confess to occasionally wiping the vinyl with a baby wipe !😯. I used the starter set of scn paints only. In regards to it being humid, no, where I live is often very cold lol.
DeleteI wondered if maybe I wasn’t washing the kit well enough? Would this have any effect?
I find it really bizzare and frustrating, I love the paints, just wish they’d work better for me ! Thanks for your help, It has helped me a lot :) I will now stir all my paints before use!
Thanks very much :)!
Okay, your answers help a lot, thank you!
DeleteYour "pounce" should be very, very soft and light, with a soft wedge. You really just want to blend or remove excess paint. Application of paint should be just enough to adhear to the doll, not sopping wet. But I think the biggest problem is the baby wipes. Anytime there has been a problem with paint not sticking, people have told me that they prepped the kit with rubbing alcohol or have used baby wipes. I recommend that you start over by washing the kit in hot, soapy water (I like to use Dawn dish soap), rinse very well in clean running water and dry with a clean cloth. If the paint still doesn't stick (I am pretty certain it will) then you might have to consider putting down a layer of matte. It would have to be the Folk Art Glass and Tile Medium as the Outdoor Matte Varnish is not for use under the paint.
Keep me posted! (I'll try to check in here more often! Life keeps getting in the way!)
This comment has been removed by a blog administrator.
ReplyDeletejudi sabung ayam
ReplyDeleteGood Morning �� I'm new at your blog and I'm really happy that I've found you. I've got a really important question to you: when I finished the baby with paint. Can I use the Satin Varnish from Genesis? And can I put the baby in the oven? Or will the paint Crack and rubb off? I hope you understand my question. Cause I'm from Germany and not really good in English . Please answer ����
ReplyDeleteHello my new friend in Germany! Yes, I understand completely what you are asking. I do not advise baking any air dry paints in the oven. If you want to use Genesis varnishes, it is best to use those first on the blank vinyl, bake, allow to cool then paint with the air dry paints. There are nice air dry products available to matte your doll once it is painted. My favorite for beginners is the Folk Art Outdoor Matte Sealer. You might have to search for it online in Germany. I have a video tutorial on this blog teaching how to use it. In the search bar on the blog type in "Applying Air Dry Matte Products". I hope this helps!
DeleteXXOO
Debbie
Yes this helps a lot!! Thank you so much Debbie !! Many greetings from Germany :)
ReplyDeleteHello Debbie :) I'm really sorry but I need your help again :( my best friend told me that I can use the Satin Varnish from Genesis and the thick medium of Genesis for my babys? Now I'm really confused ... Do I need the thick medium of Special car nursery or can I use the Genesis Thick Medium as well? I'm really happy if you answer me again and sorry for all of these questions :/
ReplyDeleteHell again!
DeleteGenesis mediums and paints need to be baked in the oven, where the Special Care Nursery Air Dry Paints, in my opinion, should not be baked in the oven. I recommend that you contact the owner and maker of the Special Care Air Dry line, Gill at https://www.specialcarenursery.co.uk
to get absolute instruction on this.
Let me know what she says :)
Debbie
Thank you Debbie! But there is one problem... On the Specialcarnursery website is no button with the contact informations :/ I´ve got no email adress or something else :/ Where can I find these informations?
DeleteI apologize for the spelling error in my greeting in the last message! I meant to say "Hello"! I have sent a message to Gill Wilkinson Hughson
Deletevia Facebook and asked for you. I will get back to you when I have an answer :)
Hugs,
Debbie
It´s okay :) Thank you so much! Hugs back!
DeleteGill states the same as I do; that you do not want to bake the Special Care Nursery Paints. Are you able to order from McPhearson's in Canada? There is an air dry matte system there that you might like.
DeleteHello Debbie! Thank you for this tutorial! I´ve got a question: how long did you wait between the steps? Doesn't one have to be dry before another can be painted over? Many greetings.
ReplyDeleteHi there! If you start with painting the head, then go to each limb, by the time you are done with all of the limbs you can move right onto the next layer on the head. :) Isn't that great?!?!? You can get much done in a day with air dry paints....I love it!
DeleteHey Debbi I love your blog! This is awesome. I´ve got a link : https://www.puppenangelika.de/p/matte-varnish-von-jo-sonja-artist-colours-40-ml-handabfullung.2267 . There is a bottle with Matte Varnish. Can I use this? Because this is much cheaper than the Matte Varnish of Art Folk Outdoor Varnish. Please... I´m really happy if I can use this bottle. Please check this link out and answer me quick :) Are the air dry paints are the same as acryllic paints? Thank you! Many greetings from Switzerland
ReplyDeleteHi!! I am glad you are enjoying the blog.
DeleteI have not personally use the JoSonja's Matte Varnish so I am asking a friend who might have. I will get back to you when I have her response, okay? Yes, air dry paints are acrylic paints but they are of a higher grade and quality than what is found in the craft and department stores. It is important to buy the air dry paints that are created for reborn dolls. Hugs from America!
I heard back from my friend. She HAS used that brand of Matte Varnish but she said that it is NOT matte. She uses it like a satin varnish for lips and nails and loves it that way. I would not recommend it for a matte varnish :)
DeleteMy friend is Angie Jones. She is the queen of exploration and has created her own matte mix that works well for her. Here is a link to her post about it with a note to me that she likes to use Arrowroot Powder instead of the cornstarch. I hope this helps: https://www.facebook.com/notes/the-reborn-connection-for-air-dry-painting-and-reborn-doll-art/how-to-use-corn-starch-to-make-your-varnish-more-matte/1962816917110779/
DeleteThank you so much Debbie �� But I'm not allowed to check the link out �� So I found another... Is this the same Methode? https://bountifulbaby.discoursehosting.net/t/cornstarch-for-matting/60723/4 And do I need to seal them when I want to sell them? Does the paint rubb off over time or can I sell them without a seal of Varnish. Thank you so much for your help
DeleteDo you use Facebook? If so, please join the group in the link above to gain access. The group is free and the information shared there very valuable.
DeleteAlthough I have finished many dolls without a sealer, it is recommended to seal/matte your dolls if you are going to sell them. It helps to protect the paint and reduce or eliminate shine. The air dry paints that I have used (LDC, Art and Magic Waterborne, Special Care Nursery and Baby FX) have not rubbed or worn off. THAT said, you can get ANY paint off if you try, even Genesis paints.
Are these paints acryllic paints? Thanks.
ReplyDeleteYes. Please see above comment regarding the importance of buying air dry paints created for the use on vinyl reborn dolls. :)
DeleteHello :) Do I have to seal the dolls with Varnish at the end if I want to sell them? Or does the paint run off at some point and the material breaks?
ReplyDeleteI would be very happy to get an answer!
Thanks :)
It is recommended to seal or vanish the dolls before selling them. It helps to protect the paint. The paints that I use do not run or rub off, or break down but it is just the best policy to seal and matte.
DeleteCan you make the skin a darker color? If so I am very interested in buying these paints, because of your tutorial, I believe I am going to try to make my own baby.
ReplyDeleteI apologize for missing this question. Did you buy the paints? Of course, you can create any tone you desire by mixing colors and adding more layers.
DeleteHey there just looking for some advice, how do I stop fluff and dust sticking on the doll while painting, even after sealing and applying varnish fluff and dust stick on the doll, ( I let the paint dry before applying different coats or anything so it's not sticky.)
ReplyDelete