
For Anonymous who asked for pictures of Kristaleta's head before work began. This is the best I could do.


Okay ladies, I first want to clarify that this is the first time I have used an armature like this in a reborn doll so I am learning as I go too. I feel I have done a pretty good job but sure am open to suggestions and helps if you have any to offer! Send a comment to me and I'll add it to this post.
I believe it takes a community to create the best reborn doll :)
**************************************
First I am going to show how I will be putting medium plastic pellet-filled bags in the crotch area of the doll. It is easier to show this without the limbs on the doll.
You actually will not be assembling the doll this way as first you will put the legs onto the cloth body. These pictures are only for teaching reference.
I have slipped the armature into the cloth body.
(you can purchase the 27-28" armature from Kemper Dolls OR Dolls by Sandie
After assembling Suzon, I am wondering if the 26-27" armature might be better.)

Here I have placed 3 medium pellet bags (purchased at Dolls by Sandie) into the crotch area. I've put two in the back and one in the front.

Another view...

To begin really weighting this doll for reborning, start without the armature. I used just plastic pellets in her feet just to the top of the foot and then FIRMLY stuffed fiber fill just up to where the armature will meet. It is really important to just stuff in small clumps of stuffing, pressing each clump down firmly before adding the next. One won't be able to fill in all of the gaps by putting a lot of stuffing in and then pressing it down~it simply does not work and creates hard spots and void spots.

Attach the legs to the body using zip ties. Here I show how her bum is going to look when I add the pellet bags later, after the armature is placed.

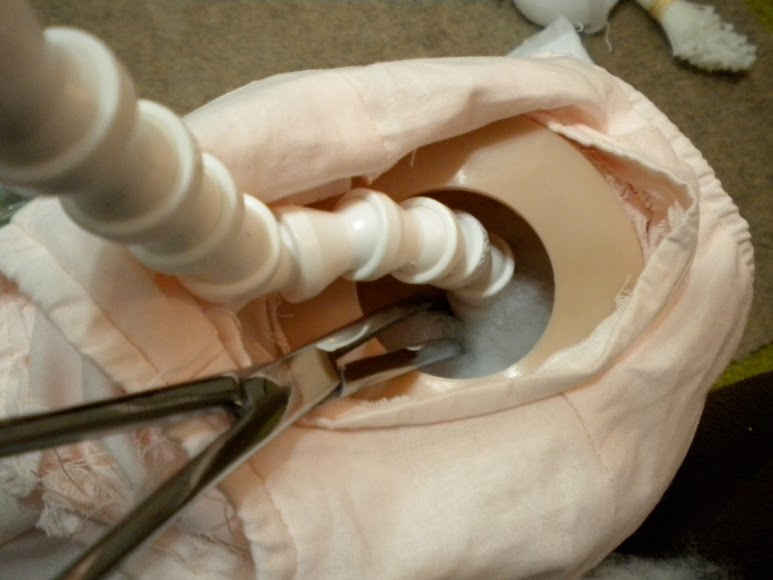
So without any stuffing/pellets in her body, place the armature inside the legs. Pull back the cloth body to expose one of the flanges of a leg. You will begin firmly stuffing fiber fill into all the areas surrounding the armature. Again, be sure to use small clumps of stuffing, pressing each as you go. You will need a firm pile stuffing, not the cluster stuff or very soft pile.

Begin placing small amounts of stuffing into the leg hole and using a strong dowel rod or large forceps, firmly fill the entire space around the armature with stuffing.
Repeat the process with the other leg.

So far, so good. She is standing on her own!

Begin weighting the body. I have re-placed the medium pellet packs into the crotch and bum area and then used a nylon of baby fat pellets (non-corrosive) along the back side of the body. Fill in any gaps with fiber fill. Because she is a standing toddler, you will need to firmly stuff her body.

She is halfway filled up and still standing!

Hmmm..I did not really take pictures of her arm assembly. It took me about 3 hours to get to the point seen below...I think I got tired! First I placed some plastic pellets in her hands and then firmly stuffed fiber fill up to where the armature will reach (I did take some links out of the armature for her arms as I did not want it to go into her hands~use a strong pier and just bend them until they snap off) There is not as much space in the arm holes with the armature in as there was with the legs. What I ended up doing is wrapping the fiber fill (quilt batting might work well for this) around the armature very snugly and then eased the fiber fill wrapped armature into the arm holes using different sizes of forceps to help. This took a long time to get it right, making sure that there were no gaps left without stuffing. Whew...it is a lot of work but worth it in the end.
So here she is with her body stuffed too. I added more nylons with baby fat pellets in the back to help balance her. Unfortunately, even after I placed her head on and re-adjusted her weight, I could not get her to stand completely on her own for more than just a few seconds. It might be the pellets in her hands. I might try to adjust this. Adjusting her and putting her head on took another hour so ladies, take your time and know that you are not alone in taking a long time to weight her. The more time you spend, the more realistically she will move and feel.
Both Kristaleta and Suzon have large, heavy heads. It is not necessary to add weight to their heads. I suggest stuffing the head with stuffing to add firmness to the head for a realistic effect.

Now...is it necessary to use an armature with Kristaleta and Suzon? No, I don't think it is, however, she may not be able to stand almost on her own. The armature sure does add a lot to her personality and posing ability. Look how cute she is in this picture with the armature bent this way and that:
 I hope I have covered everything! If not, please send a comment and I will update this post.
 I hope I have covered everything! If not, please send a comment and I will update this post.
Have an excellent day!


